Building a Website Page - Main Contents

Toms Main Section
So lets have a look at all the elements that have gone into making the main part of this front page starting from the top we'll look at it section by section.
Section 1. ‐ Hero Banner
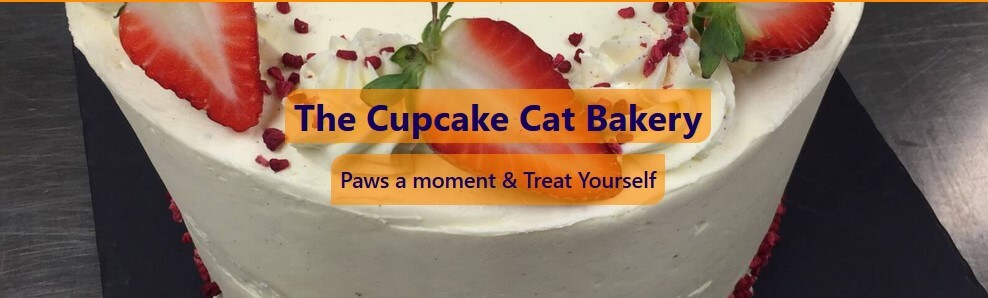
This first section of the page contains
- The
<h1>title "The Cupcake Cat Bakery" - An image in the background
- A tagline under the heading
I've put the company name here as the h1 to make sure it is the first and most important title on the site for search engines to find.
The following tagline I've added as a bit of a fun gimmick and maybe isn't quite as meaningful as some folk say a tagline is intended e.g. as an added description to who or what you are and where you do it. But it works to pull you in with humour and at the same time is being a CTA (call to action) telling you to stop, look and treat yourself, sounds like a good plan to me!
The image of a cake in the background which takes up the whole div like this is referred to as a Hero image (explained below), and as a whole these three element make up my Hero Banner.
Hero Image
A hero image is designed to draw the eye and capture the attention of the user, a bit like a billboard advert or the jacket of a book. It is placed at the beginning of your page as a background image and usually covers the whole width of the screen. How much page height it's given will depend on your design choice. It is often used like a banner taking just a portion of a screen (like I have), or covers the whole page this style tends to have minimal page contents maybe just a heading, a small bit of text or a call to action (CTA) link.
In this case I have used an image of a cake the type you would expect to find in the Cupcake Cat Bakery. To make a hero image you will need to crop and resize your photo first otherwise you may end up with a squished, stretched misshaped image, with a file size that's likely to be way too big. Which won't be a good look or very mobile friendly.
Sizing & optimising our Hero image
To do this I opened my image folder selected my photo by double clicking on it, this then opened it in my computers photo application ready to do the following steps.
- 1. Selected the edit option ‐ This then gave me the options of 'crop and rotate', 'filters' and 'adjustments' to choose from.
- 2. Selected crop and rotate ‐ It gave me some preset aspect ratio options or custom. I chose 'widescreen 16:9' and then 'make landscape'.
- 3. Adjust image and save ‐ A viewbox then appeared across my photo, using my mouse I moved the image behind the box to the part of the photo I wanted to use then saved.
- 4. Resize new image and save ‐ I then chose to re-size image, I was given different preset size options and the 'Define custom size' which I selected. This allowed me to set either the width or high of my final image size, plus a 'aspect ratio option' made sure the image was still looking sharp when saved. I made my image 1600px wide x 900px high which seems to work very well.
- 5. Optimised image ‐ checking the new file size I decided it was still too big so I needed to optimise it. I did this by using the free online app tinyjpg.com which is so simple to use you just drag and drop your image onto the page and it then does it's magic and produces you a new smaller sized file for you to download. My image size was 514 kb and was compressed to 98.1 kb but still looks the same.
The image is now ready to use so I placed it in my CSS file as a background-image to my hero_panel and set it's position to top and centre. I then placed the h1 title central to this image then added a tagline below the title and now our first section of the page is done.